DISPLAY USING AUTOVALVE CLACK
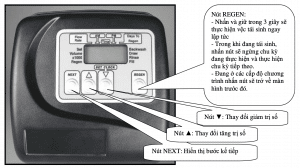
Màn hình hiển thị Autovale Clack
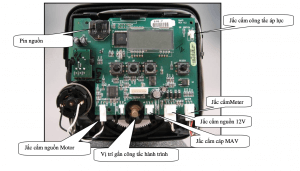
Autovale Clack board
When the Valve is operating, one of the following five indicators can be displayed, To display the next indicators press the NEXT button:
User 1: If the volume is set to Step 4CS, the display shows the remaining volume (m3) that must be used to reach the next regeneration period. If volume is not selected in Step 4CS this screen will not be displayed. If an m3 is not used this display indicator will not change.
User 2: Displays the number of days to go to the next regeneration period.
User 3: Displays flow rate m3/hour. If the Valve is not connected to the Meter, the display will display 0. User 4: Displays the total flow (m3) from the last reset period. If the Valve is not connected to the Meter, the display will show 0. Press the ▼ button for 3 seconds to reset the flow rate from 0.
User 5: Displays the current time.
Hour setting:
Press the Next button until the screen displays the time. Press and hold the ▲ button until the ← arrow indicating SET is displayed and the hour flashes. Press the ▲ or ▼ button until the correct time is displayed. Then press the NEXT button and the minute will flash. Press ▲ or ▼ until the correct minute is displayed. Press the NEXT button to return to the display.
The time may have to be reset in case the power outage lasts more than 8 hours and the power battery is exhausted. In case the battery runs out, the battery must be replaced.
FIX SCREEN ERRORS:
Normally the screen will display the operating values, but in case the parameters are set incorrectly the screen will error. To restore the screen, perform the following steps:
- Press the NEXT and REGEN buttons at the same time for 3 seconds; or
- Remove the power supply and power battery from the valve, then install the battery and power supply into the valve. •Configuration Settings:
Step 1CS : Press the ▲ and ▼ buttons at the same time for 5 seconds. If the screen is at Step 2CS
does not appear, the valve lock has been activated. To unlock, press the ▼, NEXT, REGEN, ▲ buttons in order, then press the ▼ and ▲ buttons simultaneously for 5 seconds.
Step 2CS: Select 25 for 1″ (25mm) valve, 32 for 1.25″ (32mm) valve, 38 for 1.5″ (38mm) valve, 50L for 2L (50mm) valve or 50 for 2″ (50mm) valve . Click NEXT to move to Step 3CS. Press REGEN to exit configuration settings.
Step 3CS : When 50L or 50 is selected, the next screen will appear. It is used to select the meter size used with the valve, 1.5″ (38) or 2.0″ (50).
Click NEXT to move to Step 6CS. Press REGEN to return to the previous step.
Step 4CS: Press the ▲ or ▼ button to choose one of the following methods:
• If Volume (m3) is selected the regeneration period will occur after the specified volume has been used or overwrite the date (if selected) whichever comes first.
• If 28 is selected the regeneration period will occur on the day (from 1 to 28) selected in (Installer Display Settings). Total flow, flow rate and remaining volume display will not be displayed even when the meter is in use.
• If 28/ Volume (m3) is selected the regeneration period will occur on the day (from 1 to 28) selected in (Installer Display Settings). If the meter is not used total flow, the flow rate and remaining volume display will be displayed as 0.
• If 7 is selected, regeneration will occur on the selected day of the week (see installation instructions at Installer Display Settings). Total flow, flow rate and remaining volume display will not be displayed even when the meter is in use.
• If 7 / Volume (m3) is selected the regeneration period will occur on the selected day of the week (see installation instructions at Installer Display Settings). If the meter is not used total flow, the flow rate and remaining volume display will be displayed as 0.
Click NEXT to move to Step 5CS. Press REGEN to return to the previous step.
Step 5CS : Press the ▲ or ▼ button to choose to regenerate immediately at 0 or at timeout. Instant at 0 can only be selected if Volume (m3) has been selected at step 3Cs and the meter has to be installed. dELY is the only option for the other option in step 3CS.
Click NEXT to move to Step 6CS. Press REGEN to return to the previous step.
Step 6CS : This screen will not appear if 1.0 is selected in step 2CS. Allows selection of one of the following, use ▲ or ▼ to select:
• The valve does not have hard water bypass;
• The valve acts as a generator;
• Control valve to have a separate source during the regeneration cycle, or
• Control valve to operate with control system.
Select OFF when any of the above features are not used.
SET UP THE AUTOVALVE CLACK REGENERATIVE CYCLE

Nam Viet engineer instructs Autovale Clack installation for Hoa Sen Binh Dinh Roofing Engineer
Step 1CT: Press the NEXT and ▼ buttons at the same time for 5 seconds. If the display in Step 2CT does not appear, the valve lock has been activated. To unlock, press the ▼, NEXT, REGEN, ▲ buttons in order, then press the ▼ and ▲ buttons simultaneously for 5 seconds.
Step 2CT: Choose between SOFTENING or FILTERING.
Note: The blanket valve has been pre-installed “SoFT”; The Filter valve has been pre-installed with “FLTr”, if there is no need, do not change the configuration.
Press NEXT to move to Step 3CT, press REGEN to exit.
Step 3CT: Adjust the backwash time from 1 minute to 95 minutes or select OFF to skip this step by pressing the ▲ or ▼ button. Click NEXT to move to Step 4CT. Press REGEN to return to the previous step.
Step 4CT: Adjust the salt soaking time from 1 minute to 180 minutes or select OFF to skip this step by pressing the ▲ or ▼ button. Click NEXT to move to Step 5CT. Press REGEN to return to the previous step.
Step 5CT: Adjust the second backwash time from 1 minute to 95 minutes or select OFF to skip this step by pressing the ▲ or ▼ button. Click NEXT to move to Step 6CT. Press REGEN to return to the previous step.
Step 6CT: Adjust the downwash time from 1 minute to 95 minutes or select OFF to skip this step by pressing the ▲ or ▼ button. Click NEXT to move to Step 7CT. Press REGEN to return to the previous step.
Step 7CT: Adjust the time to add water to the salt bath from 0.1 minute to 99.0 minutes or select OFF to skip this step by pressing the ▲ or ▼ button.
WS2 valve (8.3lpm); Valves WS1, 1.25; 1.5 (1.9lpm)
Press NEXT to exit, press REGEN to return to the previous step.
Initiate an immediate regeneration
– Press and hold the REGEN button for 3 seconds to perform regeneration immediately. The valve will sequentially perform the installed regeneration cycle, in each cycle the timer will count down to 0 and move on to the next cycle.
– If you want to skip the current cycle, press the REGEN button and the valve will move to the next cycle.
SETTING DISPLAY SETTINGS (Installer Display Settings) Volume (m3) selected in configuration settings in step 4CS
Step 1I: To enter display settings, press the NEXT and ▲ buttons at the same time for 5 seconds.
Step 2I: The volume (m3) used to go to the regeneration cycle press the ▲ or ▼ button to increase or decrease the volume
amount of installation. Press NEXT to move to Step 3I, press REGEN to exit.
Step 3I: Number of days in a regeneration cycle. Press the ▲ or ▼ button to increase or decrease the number of days. Click NEXT to
Go to Step 4I, press REGEN to return to the previous step.
Step 4I: Regeneration time (24) press ▲ or ▼ button to select setting time. Click NEXT to move to step 5I,
Press REGEN to return to the previous step.
Step 5I: Regeneration minutes (60) press the ▲ or ▼ button to select the setting minute. Press NEXT to exit, press REGEN to return to the previous step.
Nam Viet Environment Company specializes in providing wastewater and water treatment solutions. If you need support or a quote, please contact Hotline 0932562177

Bài viết liên quan
Drinking water treatment for pigs and issues to note
Drinking water for pigs in particular and water treatment in livestock farming in general is...
Pure RO bottled water filtration system
What is a bottled water filtration system? The bottled water filtration system is essentially an...
Commonly applied water disinfection methods
Water disinfection is a mandatory step in the drinking and drinking process. Natural water contains...